Комментарии:

So pretty, thank you!
Ответить
Interesting. Clear introduction. ❤
Ответить
Love it
Ответить
Merci bella coco ❤
Ответить
Thank you for this awesome tutorial I love it!
Ответить
Thank you so much. This is so pretty!
Ответить
My mom once showed me how to make them butterflies I am so thankful for you two thumbs up and a heart of gold to hats off to you Chow 🎉🎉🎉❤
Ответить
These came out AMAZING! So easy to follow and freaking adorable. Thank you for sharing! ❤
Ответить
Lovely! I just made my first, and it was a breeze with your instructions. Thank you 😊
Ответить
Could this be started with a magic ring rather than the chains?
Ответить
I have trying to get this beautiful butterfly crochet pattern because I love and adore 🦋 as well as my Mom friend! Thankyou for this tutorial!😊❤😂😮😢
Ответить
Thanks for this tutorial. I just crocheted my first butterfly.
Ответить
Thank you so much I was making a crochet for my friend and that is a really easy and cute crochet
Ответить
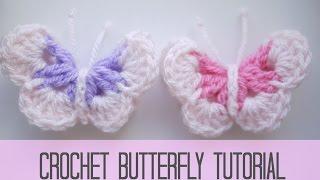
Written pattern for my notes! (Im using U.S. TERMS )
1st colored yarn:
Ch6
Slst back into 1st chain
In center circle:
Ch3, 1dc
*Ch2, 2dc (*repeat this until u have 8 pairs of dc) in total
Lastly, slst in 3rd ch at the top, ch1, fasten off
2nd colored yarn:
Knot yarn between the 2dc, not the 2chain space
Ch1 where u knotted to secure
6dc in chain 2 space, slst in space between 2dc ( repeat until u end up with a flower shape with 8 petals )

ur nails are veeeerrryy pretty :o
Ответить
I loved the flower part gonna put square border. I get sad sometimes much appreciated. They are so beautiful. Made my day. ❤️
Ответить
Thank you so much; I have follow the videos you have shared and I have been able to follow you and now a I make my 1st
butterfly I know I will be make many more good way to use all end of yarn up. Thank you

Just lost my Nan, so I'm doing this pattern again for my Aunt her sister and my Mum, cousins and put one with my Nanna at the funeral 😍💝🙌
Ответить
So beautiful loving it ❤
Ответить
I love your tutorials . This butterfly is very nice. Thank you so much ❤
Ответить
I make these into either magnets, or hang them in my garden, near my dog's, Paavo's grave, as he loved butterflies <3
Ответить
I loved it
Ответить
Oh aww do adorable and I made two so simple and nice thanks ❤🎉
Ответить
So cute 🥰
Ответить
I’ve made so many of these now. Last year an undertaker near me asked for a lot of them to give to bereaved parents so I whipped up 50 and popped them round. I hope they helped to bring a small measure of comfort to those poor people. I also put them on dementia twiddle muffs and fidget blankets. They’re useful for embellishing so many things. Thank you Sarah-Jane
Ответить
Thank you for this tutorial! I did exactly as you, however, in round 2, I did 3 DC (your Trebble). Then I chained 3 and did a Picot stitch, and chained the other 3. It turned out beautiful!
Ответить
My aunty Joan taught me this when I was around 12 yrs old n I did many of them back then ...n as time flew forgot how to do them ..ur tutorial 44 yrs later brought back all memories..I'm going to teach my school kids this ..thank you
Ответить
I keep coming back to this pattern over and over. Thank you. Jan 2025
Ответить
Thank you 😊
Ответить
The written pattern link isn't working; could you update/post a new one when you can? :) Thank you!!
Ответить
Thank you ,I learn so much from this tutorial
Ответить
Thanks for the tutorial. The Christian radio station JOY FM in the USA has people mail butterflies (any type) to them. They then mail them out to people who are sick and need to be reminded God loves them They call the program Butterfly Hugs.
Ответить
Thank you for this tutorial. I am
Making random acts of crochet kindness butterflies.
Lynn aka Lynnpenguin 🇨🇦🧶

🙏🕊️ GLORY TO OUR LIVING & LOVING GOD 🙌
Ответить
Amazing tutorial, I have been seeing so many butterfly videos and shorts but they all seem to be a derivatives of ur work
It was so easy to follow, thanks

I really like theese butterflies I am making 10 butterflies for a party and going to put them on a keyring
Ответить
Loved it
Ответить
You can’t always see the part or the work yr working on as yr camera is too lo .
Ответить
Thank you so much
I made this for my little princess 👑 🎉

Thank you so much.
Ответить
Anyone here in april 2025😅
Ответить
Thank you 🤩
Ответить
is there a left haded version?
Ответить
Great great video. Thank you.
Ответить
This is mostly for me because I don't want to watch the video every time and I have a bad memory (I use US terms)
Inner pattern:
sl, ch 6, sl st into the first ch
ch 3
In the circle: dc, ch 2, dc 2, ch 2, repeat 8 times
sl st in 3rd ch, ch 1, cut yarn and pull through
Outer pattern:
pull the yarn through the 2 dc, tie the yarn
insert your hook through the 2 dc, grab the yarn through and pull it through
6 dc in the gap, insert your hook through the 2 dc, sl st, repeat all around
sl st in first ch, ch 8, fold in half, wrap the ch's around, sl st in first ch
cut the yarn and pull through
Sorry if it's confusing I don't really know how to explain stuff (I don't make the antennas so I didn't include them).

Fantastic: so clever, so simple and quick to make.
Ответить
OMG......... THIS IS THE EASIEST BUTTERFLY PATTERN I HAVE FOUND!😍 I MUST SAY YOU ARE AN EXELENT INSTRUCTOR!🥰I AD THESE TO HAIR CLIPS THEN IT GOES ON MY CROCHET HEAD BANDS. THANK YOU FOR THE SHARE👍
Ответить
Super cute and easy, thanks!
Ответить


