Комментарии:

No better way to start a Saturday than with one of your videos. We have a motorhome and use snap pads that are permanently attached. Have a good week.
Ответить
Nice video
Ответить
Happy Saturday Jerry, I have an old 6x12 should I rip it first to make two 6x6? 😂😂😂 keep them videos coming bro! Going to make two today!✌🏻️
Ответить
thanks for sharing safe healthy and enjoyable journeys ahead Grace be with you
Ответить
we made some very similar, and are so happy we did. Great for leveling, unstable ground ETC. ! I will say yours are fancier, love the handle idea ...just may add those to ours ! lol
Ответить
Awesome ideal Jerry, I'm glad that I through of doing this (Just Joking) but I did printed this out and I will be doing this myself and since I haven't started going out camping yet it's a good time to doing it now, great video sir.
Ответить
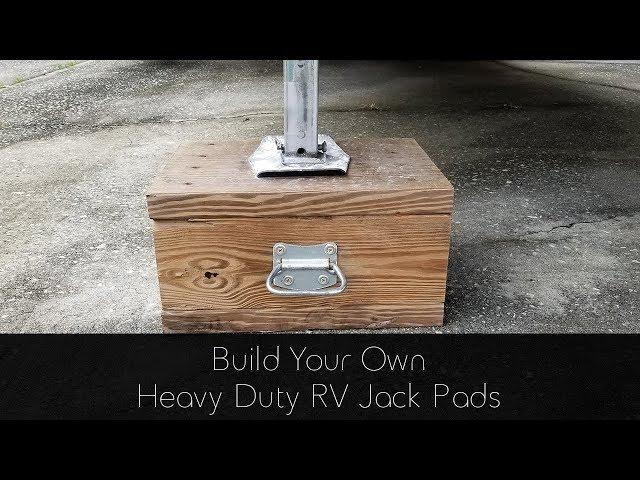
Those are almost exactly like the ones I built. Even the handle.
Ответить
We have something similar
Ответить
You do mean 6x6 posts not 2x6 posts don’t you?
Ответить
Those look really sturdy. I wanted to do something like this for my travel trailer hitch jack but I don't think my 7 1/4 in circular saw is up to the job. I asked a home improvement store about cutting a 6x6 I picked out but they only cut plywood.
What did you use to cut the 6x6 boards?
Also while there I was looking at some 14" carriage bolts to fasten 2 6x6 sections together. I was thinking of four carriage bolts an inch in from each corner but without a drill press it would probably be difficult to keep those holes straight. You would save weight with the carriage bolts but you would lose about 3" of height. I think I would go with the extra height now that I've seen your implementation.

Thanks Jerry! This is timely - im getting set to make a new set of pads for our 5er! great job! they look great!
Are you only using them in the front? i thought about making a set of 4 to include a solid base for the rear jacks.

Man those things look heavy and bulky. I'd hate to try and pull them out on soft ground where they've sunk. Many RVers are now using Snap-pads, made out of recycled tires. They even make them for our 54000 lb Diesel Pusher, but then I won't park on soft ground.
Ответить
Jerry, why do you use pressed wood?
Ответить
built 4 of those bad boys. going out in 2 weeks, can't wait to use them and show them off. you'll get all the credit of course 😁.
thank very much for sharing!!!
the hardest part was cutting the 6x6s. and you are correct, they weight a ton!!

I made a set for my 5th wheeler using 4x6 as Home Depot didn't have the 6x6. I cut them 24" long as per your plan, but in reviewing your video again you mention only 18" long and the video looks shorter than 24". Did you change something from the video to the plan. BTW, I used a miter saw to cut them down.
Ответить
I built something very similar it keeps my front auto leveling jacks from over extending.
I will steal your galvanized handle idea though. Great video !! 👍👍

Dang it Jerry! Because of your vid I had to spend quiet, stress free time morning in my garage, and make two sets for myself. I am always looking for someone else’s good ideas. Sure beats hauling all those pieces of two by sixes!
Ответить
I came across your channel when I was looking into getting an RV. I have found a TON of useful information and tips that have helped me before and after I got my travel trailer. I still come back to your channel and search for some things that you mention to make sure I get it right.
Thanks for all the information.

Hey Jerry ... will these also work under a class A motor home? When I remarried to my beautiful wife, Ann, I 'adopted' a 32' 1998 Bounder. It has hydraulic stabilizers.
Ответить
Jerry,
Where did you get the galvanized handle for the Jack Pads and what are they called? I have looked at Home Depot and Lowes and cant find anything that hinges like yours...Thanks for the info
John

We did something similar. Cut pressure treated 6x6 posts into 10" lengths (we have a 27' ultralight, so smaller works fine.) The handles are 18" lengths of bright dayglow yellow 1-1/2" polypropylene strapping, which we attached with wood screws and domed finishing washers. Cheap, easy, and visible in low light conditions. Makes handling them a whole lot easier, and we could probably hang them from a laundry line if we needed to.
Ответить
Jerry Can you help me find your video that you and Joan put on the sun screen. I want to show my husband. Thanks Terry W
Ответить
Me and Kari thought of you at Mission Tejas State Park last week.....we saw a 5th wheel with jack pads like yours...except I like your "hinged handles" better...their jack pads just had a fixed handle.......you always do a great job with the info in your videos.......
Ответить
Check out our Mission Tejas video on our channel....you will get a good feel of the campground.......top 5 in our book
Ответить
Okay sir I'm trying to find your dimension for the pads but can't seem to find it, do you use them just for your front and what about for the back?
Ответить
Do you mean 6x6 not 2x6?
Ответить
Made a mod to your design didn't want anything that high or that heavy so used three 4x4 and on the top and bottom 2x12's glued and screwed together added handles like yours but a lot easier to handle
Ответить
It looks to me like the center of these are 2- 6x6 pieces, You said 2- 2x6 pieces
Ответить
you need a strong base to support anything worth while
Ответить
Built these after watching the video. I had to alter them slightly as the home centers didn't have pressure treated 6x6's. So I bought a 12' 2x12 and a 12' 4x6, pressure treated of course. Now I have 6 pads with handles, one for each stabilizer and the tongue jack with an extra "just in case".
Ответить
Did you mean 6x6 post, you said 2x6 post.
Ответить
One recommendation drill one hole in the foot and use a drill or impact and run a large screw or lag into the wood. You said earlier that a strong wind almost blew the trailer off the blocks. With a lag screw through the foot the only thing that could happen is the trailer would move sideways but the block would be attached and move with it. You could even run a half inch rod 6 inches into the wood and let it stick up an inch and have a hole just above the foot and use a washer and clip through the rod to hold it. I did this on my lawn tractor, I pull a few clips and lift the complete front off the tractor to work on the engine
Ответить
Will the rv not shift of those blocks during strong winds?
Ответить
The real big issue here is the size of the pieces to cut down, I only have a table saw and those are large and heavy to maneuver.
Ответить
After going over a few other DIY jack pads I went with these. I did cut them back to 18 inches and added
3 more screws per side. I think they weigh about 38 lbs. each. Can't wait for them to dry out a bit.
Cost about $100 per pair. Only using for front of our 5th wheel. Didn't want to chance buying the red bucket
a few times

Thanks for sharing these Jerry. My neighbor made us a set for our 2015 Crossroads Sunset Trail 250RB. New to rving and I love your videos. We’re in Decatur, GA
Ответить
That's brilliantly easy! Thank you!
Ответить
Where do you store these? I want to store them in the truck bed but I want a way to secure them to the side so they do not move around. Has anyone found a good way to do this?
Ответить
I made these and so many people ask about them. They work well and I tell everyone about this video. Thanks
Ответить
That was a very good ideal I made a pair for our r v
Ответить
Rv jack pads
Ответить
Nice job 👍
Ответить
When you cut a pressure treated wood, you have to re-treat the cut side.
Ответить
Apply water seal so it will not absorb water.
Ответить
Hi, just found your video while looking at ways to build Jack pads. I have some 6x6s that we used on our travel trailer. This is just what I was looking for, going to Lowe’s tomorrow to get the 2/12s and handles. Thanks for the video. Happy camping.
Ответить
These bad boys aren't going anywhere, lolol.
Ответить
Jerry. I’ve a question on the size of your blocks; the 12x24 inch profile? Do you still feel the 24 inch dimension is necessary, or with the weight. I know when you shot this video, you were only using the blocks under the front supports, but now that you are in your new Montana with auto level, i expect you are using six (6) blocks now. If you had to do it over, would you go with a smaller footprint, say a 12x12 inch base? Thanks. I ask as i am getting ready to build a set of six myself. Thanks for your contact, your videos are always a pleasure to watch.
Ответить
You said there were two 2 by 6 , didn't you mean two six-by-six post ?
Ответить
I was driving by a construction site and seen 6x6 treated pieces. Stopped and asked the man in charge and he gave me enough pieces to make them. Bought some decking at Lowes and 120 screws and the exact handles as your and had about $44 in them. Only made four account already had two for the front feet.
Ответить


