Комментарии:

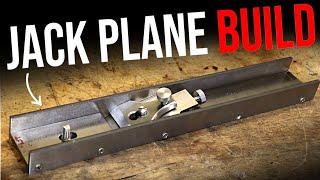
Did you consider welding the sides onto the base? Grind a nice chamfer onto each piece, then fill with a thick bead, and then machine flat.
My worry would be that there could be some slight shifting in the sides due to the screw mountings. I guess that is mitigated somewhat by using countersunk screws.

Some very high-end planes are made as assemblies of steel and/or bronze flat bar and not cast - look up Sauer & Steiner, Canada-based plane maker for instance. Dovetails are the 'highbrow' way to do the joints, but your method is solid. Fun project! Also: an easy way to mill a large flat piece like that is with toe clamps directly on the table.
Ответить
I can't wait to hear the chips scream off of the wood.
Ответить
Why didn't you use C Channel
Ответить
Lots of room to pocket material out if it's heavier than you like. Looks good either way.
Ответить
I have always been a metalworker that really enjoys woodworking, I always end up merging the 2 being making my own hinges and latches out of metal, corner protectors, metal inlays, feet, etc. It makes people nuts "Just go buy your hinges, What a waste of time, Is it because hardware is expensive" etc. I respond, "Will my hinges ever fail? Will you ever find hinges of that quality? Will you ever find hardware of that design? No, you won't. It is just a way of adding a little more uniqueness to your project.
Ответить
I like your practical approach, mate 👍🏻❤
Ответить
Interesting plane building project👌 The mild steel black bar will be more than adequate for the job.
Perhaps adding some loctite high strength retaining compound to the joints on final assembly would be a good idea to keep everything tight and rigid.

This reminds me of a guy who was building a boat in his basement 😂
Ответить
That looks like it'll be a great sized plane, looking forward to seeing it put together (was hoping to see dovetails but screws sound interesting, no doubt it'll work though). If it is around the same size as my longer plane it'll joint lots of casework sized stuff once you get a bit of practice in. If no one has mentioned it: Veritas/Lee Valley has a nice template for replacement plane handles/totes. Just search for 'Veritas Bench Plane Tote' template and the pdf ought to pop up.
Ответить
Your build reminds me a lot of how Young Ye builds planes.
Ответить
A Woodworker-Machinist : A specialized multidisciplinary Artisan and tool maker, known to be self sufficient by machining his own iron.
Ответить
I think about using a U-profile as a starting point for a steel plane. The sole wouldn't be THAT heavy like yours but it would save some work.
Could you add further mass to plane by soldering a second plate to it? A (experienced) woodworker simply glued a plate to a cheap plane iron to increase the mass, and it worked for his needs.

Nice work!
Ответить
LOVE the video!~ Can't wait to see it finished!
ps: I wish the countersunk screws on the side went all the way in T_T

You had me at aluminum bronze...😊
Ответить
This reminds me that I should finish the plane I started. Need to get some epoxy because I suck at making a matching mortise/tenon for the handle, and find the bed that has vanished since I put it down last week. Not quite as precise as this one, but it is a test just to see if my wooden design can actually hold up to work.
Ответить
That Fly is a thing of BEAUTY!
Ответить
if u can understand the drawings, then they’re good drawings
Ответить
I'm a bit dubious of your holding together the plane with screws, I don't know how you plan to align them. i hope you plan to add some locating features.
Ответить
Planes made not from solid stock are available for sale. So this is a completely working option, just not profitable for mass production. For example very beautiful Zelland н13 with brass sides on dovetail joints. In any case, they are worth a lot.
Ответить
It would be a nice project to do a dovetail version. This is great though
Ответить
Why not weld up the rough body and then machine after welding?
Also putting a couple of pins in reamed holes between the base and the angle block would have been a good idea.
From an usability aspect I think the rotational slop in the adjustable mouth/throat might be really annoying but should be fixable with a key in a slot.

Nice build, you will improve your tapping by using a tap follower held in the mill, it locates on the top of the tap ensuring a perpendicular thread. When slotting it helps to drill out the end of the slot first just a bit under size then you don’t get the slot wandering at the ends.
Ответить
I'd always wanted to know if hand planes could be made with C channel, because the basic shape of a plane body incorporates a C channel with the skirts cut to that curvy shape we all know and love. Finding C channel that conforms to the size I'd need, however...
Ответить
What, cutting bar without using a hacksaw? You have changed mate! 😂 Cheers for the vid!
Ответить
Why bother with those setups in the vice? You can just clamp it to the table.
Ответить
Life is all about the Journey,
Not just the Destination !
👍

def rich
Ответить
It did feel like a lot of work for me, and I did bugger all... 😅
Ответить
What about an old piece of railway iron for the base - just machine off one side
Ответить
andy klein's pica screws would look good for this if he makes any small enough
Ответить
Only just started to watch this. As a lifelong woodworker ( apprenticed, journeyman church organ builder, then woodwork and metalwork teacher) your assertion of an adjustable throat on the plane, especially when it has a low angle plane iron, is completely correct. Setting the throat very tight and a very fine depth of cut setting of the iron will shave the most wild grained wood beautifully. And working on end grain is a delight and it does not matter if it is hard as Lignum Vité or soft as the softest pine they cut really well. Did I see that you are proposing to use mild steel for the cutting iron? I think that might be a no no, unless you wish to be sharpening longer than actually planing the wood lol. Going to watch the rest now! Watched it now lol it's coming along pretty well. One thing I'd say is you want to take a little more off the side of the long base plate. I noticed that there was some side to side wiggle in the adjustable mouthpiece. If that's not a reasonably tight sliding fit, you will inevitably get shavings sticking in the gaps, and you'll be forever having to take the adjustable piece out to clear the stuck shavings. And that will get ugly pretty quick!😅😅😅
Ответить
Now, my friend, you are on the right track. I'll wait to comment more fully until you finish it, but that's looking good.
Ответить
Cracking vid, looking forward to to next week’s instalment 👍
Ответить
I'm surprised you didn't use some dowels to maintain the alignment of the components.
Ответить
Amazing work, dude! It's looking great!!! 😃
Stay safe there with your family! 🖖😊

I give people a lot of credit who use hand tools like that for woodworking. I prefer a jointer and planer myself
Ответить
I have been a hobbyist woodworker since the early 80s. My garage is filled with my woodworking machines. Cabinet saw 1930s delta bandsaw,router table, small wood lathe etc. My spare bedroom has my cabinet makers bench and all my woodworking hand tools. Then for some stupid ass reason I decided I wanted to make English style dovetailed infil planes and hand tools in the original Bridge City tool works rosewood and brass style. In the early 90s I bought a mini mill to help with that and I fell down the machining rabbit hole. My basement is slowly filling up with metalworking tools, including the mini mill, mini lathe, 4X6 horizontal bandsaw ( I’m not a heathen😜) MiG welder, arc welder, numerous grinders, a metrology bench with 2 granite surface plates ( the first I abused by using it to flatten hand planes before I fell down the rabbit hole, and a hear treat oven. I’m currently in the market for a SMALL surface grinder. yada yada yada Finding you have a woodworking “ habit “ is very comforting 😂😂😂😂😂 it really might be preventing insanity😂😂😂😂
Ответить
I'm confused why you went through all this effort. A plane only has like 2 critical dimensions.
Ответить
My wooden one split a year ago, i done did the stupid to let it by the window and an unexpectedly a quick snow-in hit and that's all she wrote for it. I could repair it, but honestly, i think i'll glue it to the wall above my shop as a reminder. So this, shows up in time, because now i have a path to follow.
Ответить
Why not just clamp directly to the table for long pieces ?
Ответить
Greeting from the Ohio River Valley! That thing's a beauty man I can't wait to see it completed. I always enjoy the new content.
Ответить
I would have thought some low profile clamps along the sides/ends and mounting directly to machine table would be the best way to do long thin pieces?
Ответить
Жду продолжения.
Ответить
One of my apprentice projects was a hand plane. I made mine from aluminum and used Bakelite on the wear faces. works great. But the quickest and easiest way to make one is from wood. Plenty of precident and cheap as well.
Ответить


![CON/STRUCT - The Doom [DEATH] CON/STRUCT - The Doom [DEATH]](https://ruvideo.cc/img/upload/QXJwX0FQNjk3eko.jpg)


