Комментарии:

Reminds me of a hat I have seen in some part of the World. Beautiful.
Ответить
A beautiful piece Gary. I love the idea of the three-point bowl. You made it look easy, so maybe, I will give it a try as well. Thanks for sharing!
Ответить
Très jolie réalisation Gary bravo 👍👏👋
Ответить
Splendid job Papa, you did that cherry proud. I've seen some of your peers turning these on the YT and wondered who originally dreamed up the three corner bowl from a cube idea, do you have any idea? Or has it been around in some form for ages. I also thought that a really funky stand for one of your complicated glue up turnings could be made by inverting it like a tripod, , , maybe. Best regards. 😎
Ответить
Hello my friend,
This is an indicator of high-level skills. Of course, it takes time to reach this level. Their creativity can be a reference and example for art lovers. Congratulations. See you.

COOL COOL COOL Piece again. weldone.
Ответить
I have done two so far. The second one was made from pine that was blown down during a tornado that hit Beauregard community in 2019, where President Trump came and looked at the damage. Tragically 23 people lost their lives. I donated the bowl to the Beauregard Volunteer Fire and Rescue dept. Where it is on display in honor of the people lost.
Ответить
That is fantastic. Love it. Yes, Cherry does make a nice finish.
Ответить
That is a beautiful turned 3 point bowl! I enjoy the way you turn and your detailed explanation of it. Thank you, I am a subscriber and I'm happy to be so.
Ответить
Well done 👍
Ответить
Nice one Gary, love your work, this is something I have to try soon.
Ответить
Great bowl. I tried an old piece of cedar post for my first attempt at one of these. Big mistake, extremely dry and brittle so chunks easily chipped off, and a lot was my inexperience too. I’ll try again someday. At least now I know it is not a “ right of passage” to craftsman turners.
Ответить
Very Nice 👍👍👍Thank you for sharing. Take care of yourself, be safe, and healthy 🇨🇦
Ответить
Gary, very nice this is a neat bowl. Thanks for sharing.
Ответить
Dear Papa,
WOW! This a vary unic look, I realy LOVE it.
♡☆♡☆♡☆♡

Lovely work
Ответить
That was a very good result, Gary. Never know it was your first attempt. I've wanted to try one of these but haven't had the right piece of wood for it. That and my embellishing has been a bit too extensive, lately. I need a few straightforward projects and that amount of hand sanding doesn't look appealing, at the moment. Glad polishing pastes are so effective by hand. I suppose a person could get a buffing ball to buff the inside of the bowl and use a regular wheel for the outside when it comes to polishing. Yeah, that might save a little bit of elbow grease. Thanks for showing us your fine results and have a great week!
Ответить
Nice work sir I will have a go:):)
All the best
Yiannis

Gary. I tried my first 3 sided bowl this weekend. Very nervous due to cutting so much air. I finished the bottom tonight. I’m going to attempt to make it a lidded box I think. Definitely not a speed demon on this project.
Ответить
Never understood why folk don’t cut the cube in half and have two blanks🤷🏻♂️
Ответить
Nice job Gary... I found it quit interesting how you were able to hold the peace, however my skill levels are just not ware they need to be for this project yet...LOL
Thanks for sharing

Beautiful and unique bowl. From the last profile of it on the video I see a crown, for the King you are! A great turning, teaching and addictive video. Best.
Ответить
Impressive skills. Great presentation technique. Beautiful bowl!
Just subscribed. Looking forward to more videos.
One question what is the grind on the scraper? believe you called it a "negative rake"? I always have heck of time getting nice finish on inside of my bowls.

Very Nice Piece Gary! Enjoyed the video 👍
Ответить
Soon as I'm done with building my new carving bench, this will be my next attempt. Thanks!
Ответить
A great video Gary. I was surprised how the way you first mounted it worked. Thanks for sharing. 👍
Ответить
Hi Gary, great video and I am sure that it will help a lot a of people. I also turn a smaller Version with a tealight candle incerted in the bottom.
Ответить
Ok Gary… I have to try it as well… very nice and the thickness is uniform…. Great job….
Ответить
Great job ! These are so much fun, I have only made smaller versions of this and I'm still amazed that when I complete one and it comes out in one piece.
Ответить
Very cool !
Ответить
Nice Gary, I cant wait to try one of these cube tri cornered bowls. I dropped a little short video today, Got my shop, and got moved, now to straighten my shop and get my new toy put together. Have a look at my short little 1 minute video, let me know what you think.
Ответить
Love cherry. So now you are going to follow this one with something more complicated?
Ответить
Gary. I finished the final shape today. It turned out ok for my first one but I’m getting tear out on the ends of two wings. Not sure if my tools are not sharp enough or I’m turning two slow. I was able to fix with some hand sanding and ca. I’ll post it on IG. Not sure if your there or not
Ответить
Hey Gary, Beautiful bowl and the 3 corners is just amazing. Thanks for the idea. Yall have a wonderful day.
Ответить
Looks great
Ответить
Outstanding Gary very beautiful and sorry it’s took me a while to watch the videos I am behind my parents were sick and they passed away two weeks ago take care and God bless my friend
Ответить
Very nice Gary. It turned out really nice. Pretty nice looking bowl. Thanks for sharing the video.
Ответить
You are so skilled and talented in how you come up with your projects. Beautiful work!
Ответить
Fantastic Gary superb workman ship amazing
Ответить
Great job, love the tip about the negative rake scrapper. I will be using it for sure. My bet it was Phil that did the previous video.
Ответить
I've been using Minwax Polycrylic as you did with abrasive paste and can't be please with the results. Others guys in our club have started to use it also. THANK YOU!
One question...assuming the bottom is finished with Polycrylic, what kind of pen do you use when signing it?

It's beautiful! I love it! ❤
Ответить
Oh that turned out great! I live the finish and the shape is amazing! It’s a true beauty! Great job! Bravo!
Ответить
Hi Gary, I watched your video and Phil Anderson’s and decided I’d like to make one. I wasn’t sure I could hold the work in the lathe as you did and I was correct. So I removed the corners so I had flat surfaces for the drive and live centres. It worked out well and I now have a tri-corner bowl about 115mm corner to corner and 70mm high. I started with a piece of mahogany 93x93x94mm.
Ответить
Very pretty!! Shape & color are great
Ответить
I had no doubt that you could do it. Beautiful.
Ответить
Sarebbe interessante aggiungere 3 pezzi di colore contrastante e ricondurlo ad una ciotola classica.
Ответить
Great explanation! Great skills too, thank you for a job well done.
Ответить
Nicely done! I've made two of these from Live Oak. I put a bit of blue masking tape on the corners while I hollowed out the inside of the bowl (So I could see those corners flying around.) On the second bowl after I took the tape off for final sanding, while sanding my hand slipped, and although it did not break my index finger it was a near thing. Maybe one day I'll try a third one.
Ответить
I think it's wonderful and I must try it sometime
Ответить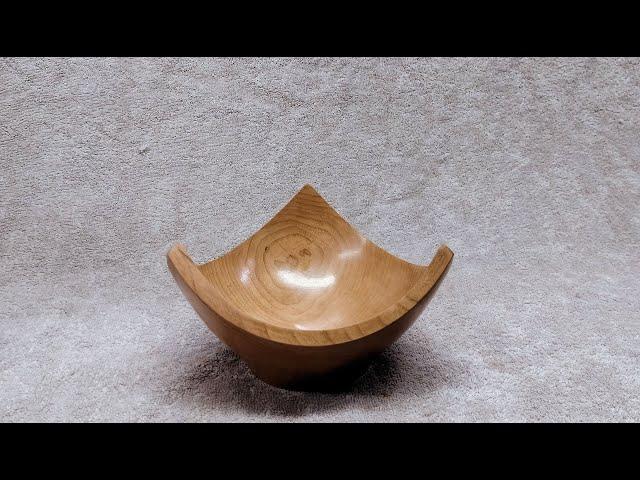


![[FREE] Rod Wave Loop Kit | Toosii Loop Kit - "I'll See You" (Rod Wave, Toosii) [FREE] Rod Wave Loop Kit | Toosii Loop Kit - "I'll See You" (Rod Wave, Toosii)](https://ruvideo.cc/img/upload/a0VidEZMMzZrUnQ.jpg)


